NFT Collections
NFT Collections on Unyfy serve to group NFTs. A very intuitive example of a collection would be the "Our Team" collection comprising individual NFTs of all athletes.
Managing NFT Collections
When you navigate to NFT collections in UPM you will first find an overview of all collections. You can search and filter in various ways to find the collection you need.
At the top of the page, you will find your two primary options:
- Edit Order: Using a drag-and-drop mechanic, you can sort how NFT collections are displayed to your community.
- Create Collection: This will let you create a new NFT collection. Find more detail in the next section.
Creating a Collection
When you are on the Collections page you find an overview of all collections you have created in the past, including archived collections, and have the option to create a new collection.
A collection comprises the following details:
- Title: Shown prominently on the collection's card
- Preview: This is shown on the collection card in the NFT Showroom.
- Description: The description is shown in the collections detail view.
- Hero Medium: Will be shown as the preview for the collection. You can add a hero medium for each language individually. If you only upload a single hero medium, it will be used across all languages.
- Slug: The UPM will auto-suggest a slug for the collection based on its title. However, you can manually create a custom slug for it. The domain for any given collection will be your-domain.com/nfts/showroom/slug/.
- NFTs: Additionally, the collection comprises the NFTs in it. If you have already created the NFTs you can simply select the ones you want to add from the dropdown in the settings panel. If you have not created them yet, you can add them later on when creating the NFTs.
- Sponsor: You can optionally attach a sponsor NFT Collection
- Category: You can add categories to your NFT Collections to make them easily findable for your users.
You can pin a new or already published NFT Collection to the top of the home feed by turning on the Pin to top toggle in the Collections's settings. It will stay pinned until you pin another content to the top or disable the Pin to top toggle.
If you enable the Pin to top toggle for a collection that is currently in draft status it will be pinned as soon as it is published.
Blockchain Royalties
When you allow your users to transfer NFTs to a public blockchain or when you create collections on a public network directly, users are free to trade their NFTs on public marketplaces.
By setting a Seller Fee you can decide how much of a revenue share you want to receive for every secondary market sale of your NFTs.
- Seller Fee: The revenue share on NFT sales that goes back to you as the Unyfy platform operator.
- Fee Recipient: The blockchain address that the seller fee is sent to. Make sure to provide a correct address here!
Many marketplaces started allowing users to circumvent the seller fee by replacing the value you set for it with a custom value. We cannot guarantee that you will participate with a revenue share in every sale on a secondary market. This is simply the nature of the web3 world, where users really own their digital assets.
Editing an NFT Collection
Once you have created a collection you can still edit its description, add or remove NFTs to or from it, or archive the entire collection.
Once users have received or collected an NFT from a collection, the collection will always be visible in the My NFTs section of the app, even if you archive the collection. The analogy would be a Panini booklet that is no longer sold but a user still has it.
Edit the Order of NFTs in a Collection
You can manually change the order in which NFTs are displayed in a collection.
- In your UPM, navigate into an NFT Collection.
- Switch to the NFTs tab.
- Click Edit.
- Simply drag & drop the selected NFTs in the correct order.
- Click Save.
Content Availability
For each content and resource you publish on Unyfy you can manage to whom it should be available. You can use NFTs to specify content availability.
Reward Completing a Collection
You can reward users for completing an NFT collection with an NFT Giveaway or a Token Giveaway.
Simply go to the Giveaways section in your UPM and create a giveaway based on the event User completes NFT collection.
Deploy an NFT Collection to a Public Blockchain
With our NFT Bridge you can make NFTs created and minted on Unyfy available on Ethereum and Polygon. This allows your users to transfer their NFTs to their own MetaMask wallet and to list them on established NFT marketplaces such as OpenSea.
For each collection you want to make available on Ethereum, Polygon or another EVM-compatible blockchain you first need to deploy the collection contract to the blockchain in question. Don't worry - this works right out of UPM without having to use any code.
Before we go into detail these are the steps to deploy an NFT contract to a public blockchain:
- Set up your MetaMask wallet
- Get some ETH and/or MATIC in your wallet.
- Initiate the contract deployment from your UPM.
If the blockchain you are looking for is not available by default you can add it manually. Here we tell you how.
Deployment Cost
Pretty much any action you take on a public blockchain will come with some sort of transaction cost - this includes the deployment of a token contract.
To deploy an NFT Collection from Unyfy to a public blockchain you will need to cover the initial cost of deploying the contract. To pay for the deployment you have to use the native token of the network.
- for Ethereum this is Ether (ETH)
- for Polygon this is Matic (MATIC)
Setting up MetaMask
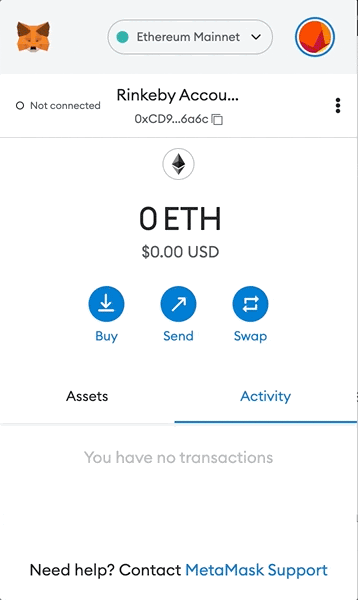
In order to pay for the deployment of the NFT contract, you have to set up MetaMask and fund your account with ETH or MATIC first.
MetaMask is available as a browser extension for Chrome, Firefox, Brave, and Edge as well as a stand-alone app for iOS and Android.
After you have downloaded the browser extension you need to set up your wallet by creating a password and saving your recovery phrase. MetaMask is very user friendly and you will be guided through the setup procedure step-by-step.
Using a Test Network
We recommend testing the deployment of an NFT collection to a public test network first, so you can get familiar with the steps involved and also save money. As said above, you need the native token of the blockchain you want to bridge your NFTs to.
MetaMask supports not only different blockchains, but also different test networks. In order to switch to one of the testnets do the following:
- Open MetaMask
- Click on your user avatar and select Settings
- Select Advanced and enable Show test networks
Faucets
For the test networks available by default, you can get free ETH or MATIC via the following faucets.
- Ethereum - Ropsten Faucet (Ropsten will deprecate in October '22)
- Ethereum - Rinkeby Faucet
- Ethereum - Sepolia Faucet
- Ethereum - Goerli Faucet
- Polygon - Polygon Mumbai Faucet
- Polygon - Polygon Amoy Faucet
Here, each day you can claim a small amount of test-ETH or test-MATIC for free. Simply enter your MetaMask wallet address and shortly after you will receive some ETH or MATIC.
Once you have MetaMask set up and you account funded with some test-ETH the tricky part is done. The rest you can do from the comfort of your UPM.
Deploy your NFT Collection to a Test Network
Now that you have set up your Metamask, connected it to a test network and received some test ETH from a faucet you can deploy your first NFT collection to a public blockchain.
- Go to NFTs / NFT Collections and select the collection you want to deploy
- Switch to the Blockchains tab in the collection detail view
- Select the network you want to deploy to and click Deploy
- Now MetaMask will open up...
- First, it might ask you to switch networks in case your MetaMask was not set to the network you selected in UPM. Simply confirm this step.
- Next, it will show you a confirmation screen of the action you are about to take (Contract Deployment) and the associated transaction cost. Confirm this step.
- Now you might have to wait for a minute or two (sometimes much quicker) before MetaMask will show you a confirmation that your contract was successfully deployed.
- You and your users are now free to transfer NFTs from Unyfy to the blockchain you just added. Read the section below for how to transfer NFTs.
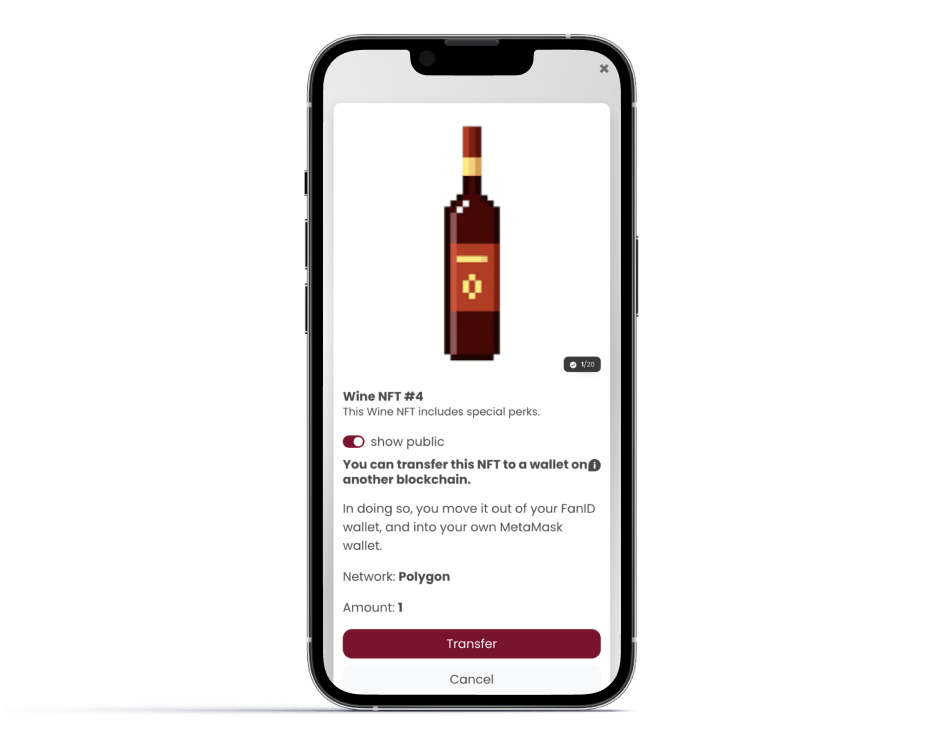
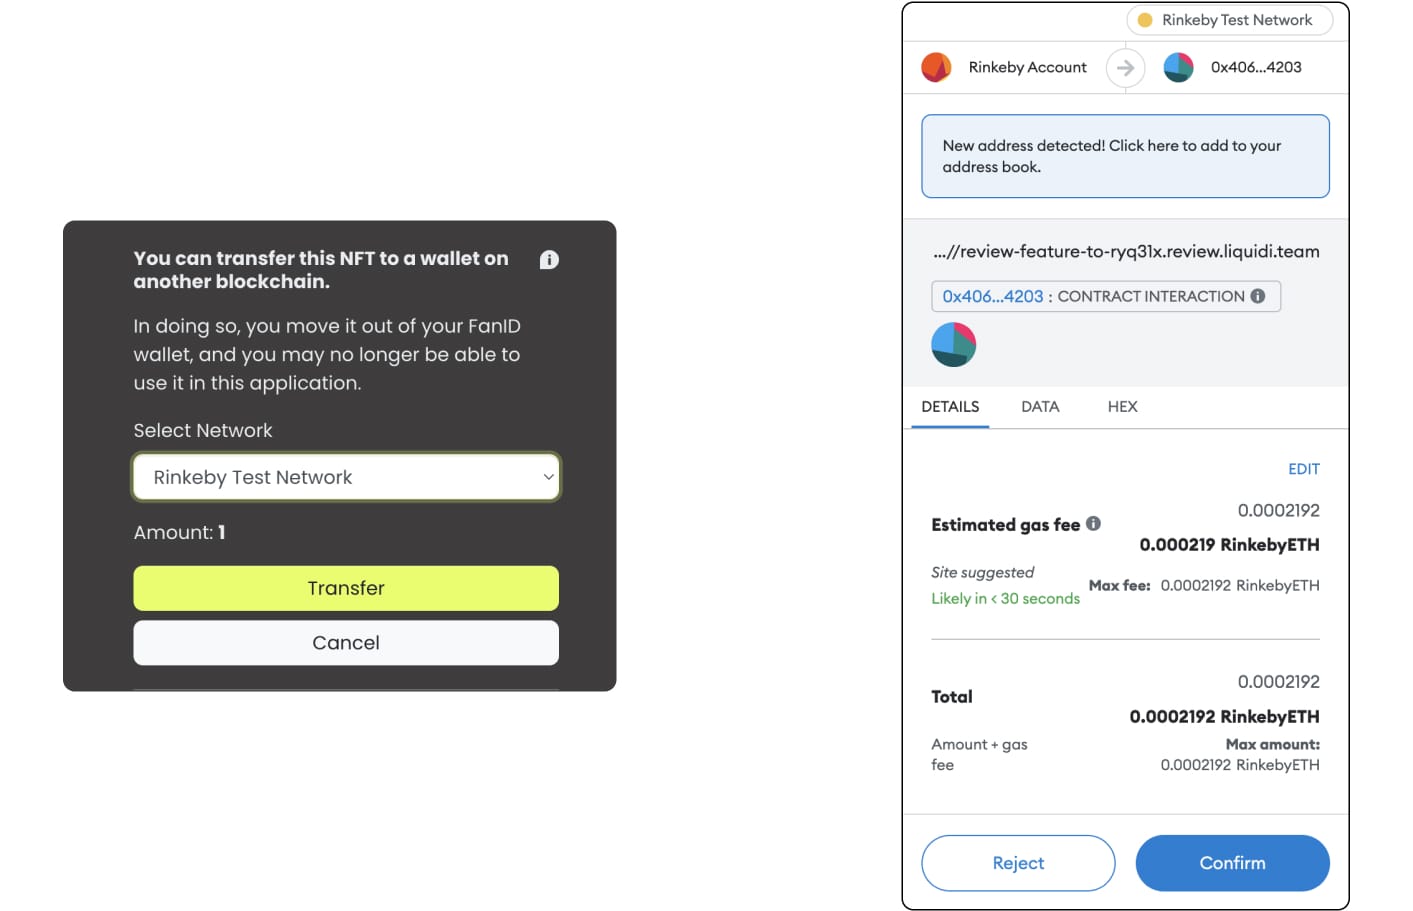
Transfer an NFT to a Test Network
To transfer an NFT hop into your Unyfy platform and go to the My NFTs section
- Select an NFT that is part of the collection you just deployed
- Click the Transfer button (see screenshot below)
- Select the network you want to bridge the NFT to (if you have deployed to more than one) and confirm the transfer
- Lastly, MetaMask will ask you to confirm the transfer as well as the transaction cost for sending the NFT to your wallet
- That's it. The NFT is now in your Wallet. You can now go to testnets.opensea.io and connect your wallet to see the NFT and list it if you want.
Managing Blockchains for an NFT Collection
From the Blockchains tab in any NFT collection you can deploy it to different networks and find the corresponding contract address for each collection.
- You can deploy the same collection to multiple blockchains. Simply click Deploy for each network it should be available on. Keep in mind you will need to cover the deployment cost for each chain in the native token.
- Once a collection contract is deployed this action cannot be undone. However, when you disable the toggle Show this network to users, your users will not see the option to send their NFT to this specific blockchain.
Deploy an NFT Collection to the Mainnet
Now that you have set up your Metamask, tested the deployment to a test network and transferred your first NFT you are ready to go live with your NFT bridge.
Before you start with the steps below make sure to have your Metamask wallet funded with some ETH for deploying to Ethereum or MATIC for deploying to Polygon. You can get ETH or MATIC on most every exchange, e.g. Coinbase, Binance, BitPanda (EU based) and many other.
- Go to NFTs / NFT Collections and select the collection you want to deploy
- Switch to the Blockchains tab in the collection detail view
- Select the network you want to deploy to and click Deploy
- Now MetaMask will open up...
- First, it might ask you to switch networks in case your MetaMask was not set to the network you selected in UPM. Simply confirm this step.
- Next, it will show you a confirmation screen of the action you are about to take (Contract Deployment) and the associated transaction cost. Confirm this step.
- Now you might have to wait for a minute or two (sometimes much quicker) before MetaMask will show you a confirmation that your contract was successfully deployed.
- You and your users are now free to transfer NFTs from Unyfy to the blockchain you just added. Read the section below for how to transfer NFTs.
Transfer an NFT to the Mainnet
To transfer an NFT, hop into your Unyfy platform and go to the My NFTs section
- Select an NFT that is part of the collection you just deployed
- Click the Transfer button (see screenshot below)
- Select the network you want to bridge the NFT to (if you have deployed to more than one) and confirm the transfer
- Lastly, MetaMask will ask you to confirm the transfer as well as the transaction cost for sending the NFT to your wallet
- That's it. The NFT is now in your Wallet. You can now go to opensea.io and connect your wallet to see the NFT and list it if you want.